Monday, November 19, 2012

Wheels done and installed on IH #9 mower

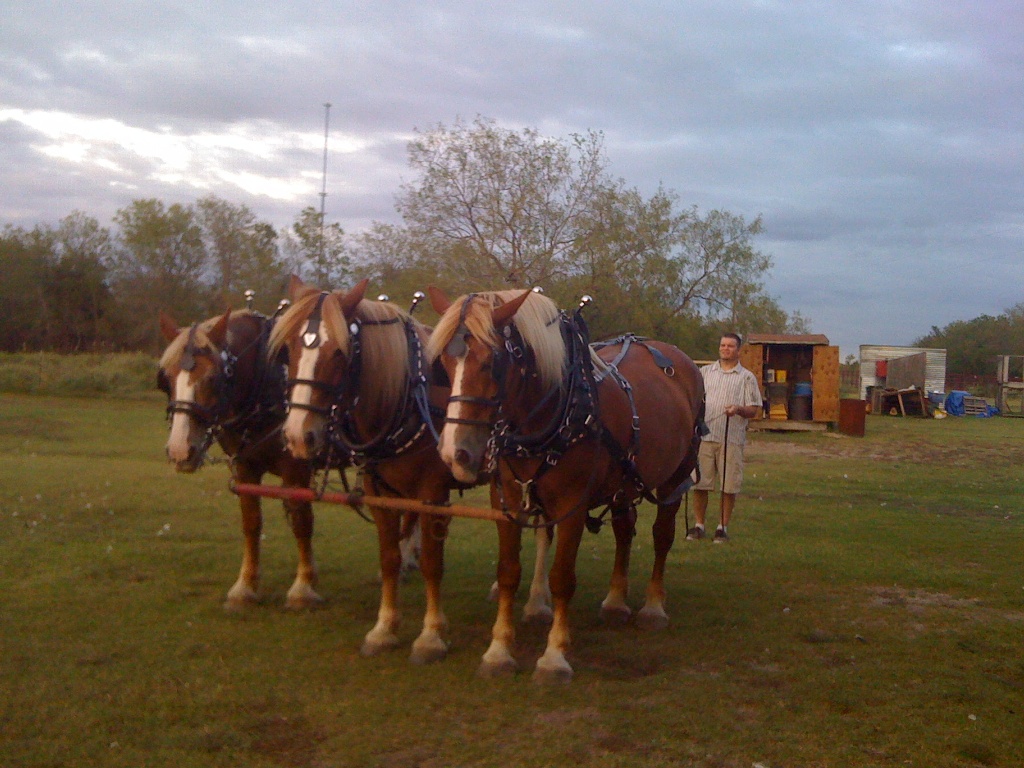
The wheels are currently installed on the mower.  Very exciting.  And I only made one mistake that may cost me to have to buy a new hub.  :S  Yikes!  I hate those kind of mistakes.  But ... before we get to any of that, here's the picture I took this morning:

Here she is!  So nice to see this mower with wheels holding it up instead of jack stands. 

I've said before that I sanded down the wheels and painted them.  I didn't paint the inside of the hubs, I just left them as is.

Once the paint was dried, I noticed that there were some holes in the shaft section of the wheels.  I figure these had to be for grease zerts.  I bought some grease zerts that you screw in, and noticed right away that you can't just screw a bolt into cast iron.  Those threads just spin and don't dig in and bite into it.  I was lucky and happened to have a tap the size of the zerts I got.  This also happened to be the same size as the hole in the first wheel.  I tapped it, and the zert screwed in no problem.  This was easy.  1 wheel down.
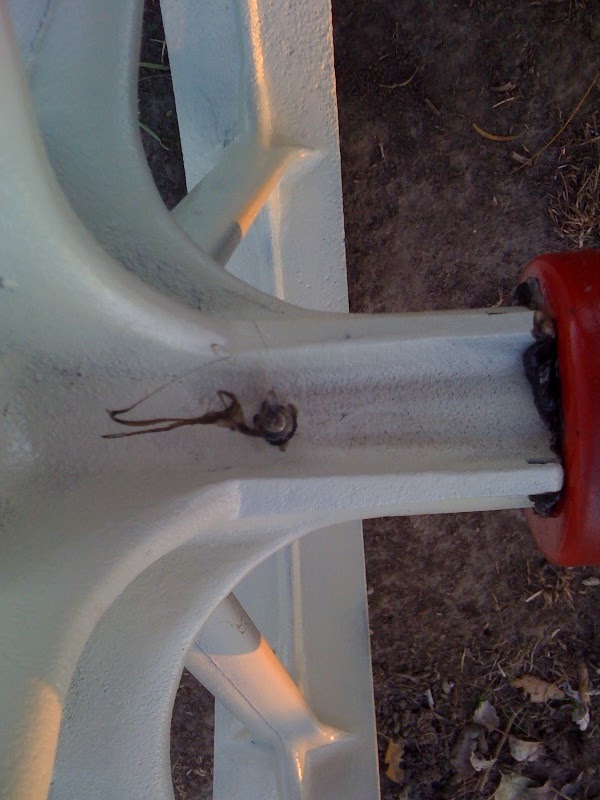
The first wheel after installation with a single grease zert.

The second wheel caused me a bit of a headache.  There were actually 2 holes.  It looked like the hole for the grease zert had been widened a bit.  I couldn't find a way to seat the zert in the original hole.  So, I drilled a new one.  This is where I learned that when you are going to tap something, you need to drill a hole SMALLER than the bolt size.  Yikes!  Now this wheel had 3 holes in it, and I couldn't use any of them.  No problem ... just drill another one.  This one tapped fine and a zert was installed.  Now, what to do with those open holes?  I knew if I leaved them, that rain could get down to my axle, as well as when I greased it up, grease would just shoot out of the holes.  I decided to use my good friend JB Weld.  :)  I used my long fingers to set masking tape on the inside of the axle hole on the wheel.  I then mixed the JB Weld and as I squoze it into those holes, I kept my finger in the axle shaft pressing up so that the JB weld did not push down at all into the axle shaft.  Once I was done spreading the JB Weld, I shoved a wad of newspaper down the axle shaft to make sure nothing happened while it dried.  I let this cure for 2 days and figured it was good enough to try.
The second wheel.  You can see the JB Weld sealing the 3 other holes.  This worked very well.

Last night, armed with my wheels, hubs, and grease, I decided it was time to install the wheels.  The wheels went on super easy.  I greased up the axle, and applied grease to the inside of the wheel and they both slid on with no effort.  The hubs slide on easy too.  I installed the left hub very easily.  You just press the tines in as you press the hub on and then thump a few more times with a rubber mallet till the axle pin holes line up and you're set.  Pound in that axle pin, and then drive in the key pin and  you're done.  Easy!

As I went to get the right hub, I realized that the hubs mattered what side they went on.  The hubs are designed to engage the axle when pulling forward, but when rolling backward, those tines just click on the wheel so the axle doesn't engage.  If you install them backwards, they mower would work the opposite, however, I believe the way the key pin and axle pin line up, you can't install them backwards.

All went well on the second wheel and then I pounded in the key pin.  THEN I MADE A MISTAKE!  :(  I pounded the key pin in one too many times.  As the hammer hit it, I heard a noise, and the cast iron hub had cracked.  :(  It's just a hairline crack, and the hub is still in place on the axle, but I have no idea if it's going to stay on.  This did not excite me.  Ugh!  So ... if you are doing this, DO NOT POUND THOSE KEY PINS IN TOO HARD!  I'm just going to continue using it till it breaks.  Macknair doesn't have a left hub at the time, but when he gets one in, it will be a 60 dollar part.

It's so nice to see this thing with the wheels on it.  I've been looking at a rust colored machine on jackstands for far too long.  It's awesome to see a shiny red mower with new white wheels and blue hubs.  Things are coming along nicely!

Up next I order a new gag lever hinge, and then I prep the sickle blade.  Getting exciting!!

UPDATE:  OK, so apparently I wasn't supposed to put grease zerts on the axles.  The holes there are supposed to be used twice a year to apply oil (assuming 90w gear oil).  In my mind, I saw some other grease zerts and thought the holes on the wheel had to be zert holes.  Wrong.  This answer came up because I noticed that the yoke and lift mechanism had holes in them.  I thought they were for some kind of zert, and asked the guys at Macknair if they had them.  That was when I was informed that those holes were meant to be open, and that twice a year you should oil the parts through there.  He was surprised I got a zert on the wheels.  Whoops.  I'm thinking I should be OK.  I'll post if the grease has any kind of bad effect on things.


IH #9 Mower Page

Saturday, November 10, 2012

More paint and initial re-assembly of the IH #9 mower

Today was a great day.  Cool temps with sunshine, my favorite kind of day.  The first thing I did, was to finish prep on my 2nd wheel, and paint it.  YAY!  I currently have both wheels sitting in the garage, ready to be installed.  I drilled new holes, threaded them, and added grease zerts to the wheels since it looked like the old ones had fallen out.

I found another part that I hadn't prepped for paint yet.  It's the Gag Lever Hinge.  When I instpected it, I found some pretty major cracks in it.  This must have happened when I was pounding out the pin from the hinge and the yoke.  Ugh!  Looks like I need to buy this from the Macknairs.  Luckily they have it listed as available and for $22.  Once I have this, I will be ready to install everything but the sickle bar.  Very cool!
If you look closely, you can see 3 cracks.  One where the pin goes, and 2 in each of the corners.  Good idea to replace this part and not try to reuse it.

I think this is a good place to mention something on this mower that I am not re-installing.  My mower was equipped with the vertical lift assembly.  What this is, is a rod that attaches from the lift assembly to the clutch.  This makes it so anytime you lift the sickle bar, it automatically engages the clutch (so the sickle bar isn't working while it is in the vertical position.  I would have had to replace a part to have it working good, and the guy at Macknairs told me that most people just don't put them back on.  This means I'll be responsible for engaging the clutch anytime I'm not cutting.  I'm fine with that.  :)

The assembly was kind of fun.  I was impressed that I actually remembered how it went.  I used the Lynn Miller book when needed to help me remember how the lift assembly all went together.  I took some closeup pics of how it is looking.  Enjoy!

Here is the lift assembly put back together.  Looks really good with it all painted.

This is the view of the lift assembly from the right.  The pin on the lower right is for the vertical lift stuff that I didn't put back on.

A rear view.  Here you can see the tension spring, and also the tilt lever and it's assembly.

Here's the clutch.  The hole that has nothing hooked up is for the vertical lift assembly that I am not installing.

IH #9 Mower Page

Changing the seals on my IH #9 Mower

Now that I have the frame all painted, I decided it would be a shame to not replace all the seals with the mower broken down this much.  I bought all the seals from Macknair and sons (www.macknair.com).  I have found them to be VERY knowledgeable and great to work with.

One word of advice ... when removing the old seal, BE CAREFUL NOT TO MAR UP THE area where the seal sits.  Make sure you only pry on the seal itself, not the housing around it.  When installing the new seals, BE CAREFULL TO APPLY PRESSURE EVENLY as you install.  Take your time and be nice and easy and the new seals will slowly tap right into place. 

Pitman Seal

To replace this one, remove the pitman shaft (I did it the way Lynn Miller suggests in his book).  Once the pitman shaft is removed, get a seal puller, and remove the seal.  This is easy to do with a seal puller.  The original type of seal will be thick with a metal housing on both sides.  Just pry at it with the seal puller till it is freed.  The new seal will be 2 seals, instead of one.  In order to accomodate the thickness of the seal, Macknair will send you 2 of the correct sized seal.  Install both carefully.  Then, reinstall the pitman.  This happens in the reverse from when you removed the pitman.  Be gentle sliding the shaft through the new seals.

NOTE:  One thing I struggled with, was getting the pitman shaft to slide through the bearing properly.  I struggled with this, then got it, only to realize that I didn't have the gear on.  SO ... here is how to put that thing together.  Gently slide the pitman shaft in.  Make sure it slides through the bearing, and then place the washer on, and put the gear into position.  Start turning the pitman clockwise (from the front), and watch through the gear to see if it is starting to thread.  If not, tap the pitman a few times with a rubber mallet.  As you push on the pitman, the gear will push against the big flywheel in the gear housing because of the angle of the teeth, this will hold things in place.  Once those threads start turning in the gear, just keep turning the pitman clockwise with the rod tool in place to keep the gears from turning.  Hope this helps. 


This is the rod tool.  I showed this before.  It's a broken tooth from an old hay rake.  Worked great!


Clutch Seal

The clutch seal is the smallest seal.  To remove this, many sources say you have to remove the gears from the gearbox to have an open hole in the seal.  I did NOT do it this way.  I worked gently to remove the seal while the meal clutch rod was still sticking through the seal.  To do this, I hammered a small flat head screwdriver into the side of the seal to make a hole.  I then used the seal puller to cut the metal all around the seal, releasing the center of the seal.  I then used a screwdriver to slowly work at, and pry at the seal till I was able to remove it.  To install, I used a piece of 1" PVC pipe to pound the seals in.  Once again, this will be 2 seals installed in the location of the one thicker original seal.

Axle Seal

The axle seal is removed the same way we did the Clutch Seal.  Use screwdrivers to break down the seal and pry it out.  This will destroy the seals.  Make sure you do not mar up the seal housing on the frame.  To install the new seals (1 seal each axle), I just used a hammer to gently tap all around the seal and knock it in.  A second hammer will help with this too, just use both to hit the opposite sides of the seal at the same time.

YAY!  Now that the seals were done on my mower, I reinstalled the pitman, removed the gear cover, and filled with oil.  I then put the lid back on with the new gasket that I bought from Macknair and sons.  I'm very excited to have this much done. 


IH #9 Mower Page

Painting my IH #9 Mower

With the machine broke down, and each individual part being prepped, the paint can start.  I'm using rattle cans and I'm very satisfied with how it is working.  The pictures below show most of what I have done at this point.

This is how I typically did it.  I prepped enough parts to fill a table top (all the same color), and then I painted them all at the same time.
Here are some parts that are complete and ready to be put back on the mower.  Sickle bar, wheel hubs, pitman arm, sickle bar shoes, and more
One wheel done.  Wheels are a pain in the ass to prep.  They sure look good after they get painted though.
Painting the seat, yoke, clutch pedal, pitman shaft, and a few other parts
The stem of the seat will be painted blue, so I taped it to keep it from getting painted red
Another view of the first coat of paint
Complete.  These parts are now painted (besides the blue stem on the seat)
I painted the bottom of the frame first.  Here it is, looking so much better than before
Another view of the bottom of the frame
And here is the top of the frame.  Note that the axyles were taped to try and keep paint off them.

Another View of the top of the frame.


IH #9 Mower Page

Prepping the IH #9 Mower For Paint

Here are some pictures of what it looked like as I disassembled the mower and prepped it for paint.

To prep, I did a total breakdown of the machine.  Then I took each part individually and used a wire wheel brush on my drill, or used a sanding pad on my grinder and removed all the rust that had accumulated over the years.  This took a lot of time and effort.  After sanding/grinding, I then wiped each part down with Mineral Spirits in order to get them ready for paint.  This worked great, and made the paint stick great.

One idea you might try before total breakdown, is to take the entire machine to a sandblaster while it is all together.  That may do most of the work for you.

The pictures below are what the prep process was like:

It takes a lot of effort to sand down the frame of the mower.  A grinder with a sand-paper wheel was much quicker and easier than a wire wheel.  I still needed a wire wheel to get in some of those tight places

Another view of the now shiney top side of the frame

Yet another view of the top side of the frame after I cleaned it up.
The bottom of the frame, prepped and ready for paint
Another view of the bottom.
While upside down, take a look at the underside of the toolbox to see what year the mower was made.  This one was made in 1943.
 To really get the prep done right, I decided to remove the pitman shaft from the mower.  Here's how I did it.  I sat over the top of the mower with my right side towards the front of the mower, and my left side to the rear.  I grabbed an old wire/rod from a hay rake and a pipe wrench, and I removed it exactly how the Lynn Miller book says.  I took the lid off the gear box.  I then slid the hook part of the wire/rod tool between the gear teeth to hold it still.  This is where the book doesn't clarify.  Just so you know, the pitman come off in a counter-clockwise motion if looking at it from the front.  In order to do this, you have to hook the part of the rod on the UNDER SIDE of the gear.  Once the rod is in place, place your pipe wrench on the pitman shaft that is sticking out, and pull the pipe wrench towards you.  I was shocked at how each mine came out.  This was one of the few things on this mower to go easy.

The removed pitman shaft, prepped and cleaned

This is the rod/tool I used.  It is an old rod from a hay rake.  This worked perfectly

And this is a picture of some of the parts just sitting waiting for prep.


IH #9 Mower Page

Friday, November 2, 2012

Being the lead

I had an interesting experience that I figured I'd tell about.

There are sections of my fencing that have 2 strands of hotwire.  The horses know what these are, and they stay away from them.  We feed on one stretch of such fencing.  I got a call from my wife, telling me that Nellie (the lead mare), had somehow gotten out.  She explained that somehow she went over the low strand, and under the top strand.  She was leaving, and I wouldn't be home till late, so I had her just shut our front gate, and I'd take care of it when I got home.

Later that night, when it was dark, I arrived home to find a very content Nelly grazing down on the green grass, with 3 other horses very jealous of her freedom.  the fence was still intact, but the bottom line was stretched a good bit.  I figure Nellie decided to grace through it, and then when she got popped on the whithers from the top line, she jumped forward through the fence.

Now, when I arrived, and saw Nellie, she held her head high, and trotted away from me 5 feet due to the sound of my motorcycle engine.  Any one who has had horses knows how getting horses back inside their fence can cometimes be an ordeal, especially when the horse is a moody, pregnant, lead mare.  I suddenly had images of me chasing her down, or trying to use feed to sweet talk her back into her enclosure.  It was already late, and I sure didn't want to spend my time out chasing a horse.

What I experienced was completely different.  As the motorcycle was shut off, I walked towards Nellie and talked to her.  She turned her head to me, and I pet on her a bit.  We were near the gate, so I walked over to it, and to my surprise, Nelly followed.  I continued to talk to her.  I opened the gate, and had to get Pam out of that area.  Pam wanted out, and I wasn't about to let her.  I was careful not to clap or anything with her, as I didn't want Nellie to back off.  I simply talked in my firm voice, and walked forcefully towards Pam.  She reacted by trotting off and out of the area.

I then opened the gate, said sweetly, "Come on Nellie, let's come inside".  She walked right in and spun around for me to pet on her again.  How easy is that?

It's times like this that I am so grateful for the horses I have.  I feel like I know them, and they know me.  Being able to control a horse using vocal and body language is something that is amazing to me, and I am so greatful for what I know of it.  When it comes to me and my herd, I am the lead, they know it, and they respect it.  When you develope this kind of relationship with your horses, it makes all the other things so much easier to handle.

Monday, October 22, 2012

Checking in

I figured that I'd better at least say hello.  Been a month since I last posted.  I've been busy with all kinds of stuff, but I have been doing some things I'll share soon.

Mostly I've been working on the sickle mower.  I need to sand and paint 1 wheel and the sickle bar and then I'm done.  The main body is painted, along with all the other parts.  Also,  I did remove the pitman wheel from the mower.  It was VERY easy to do and I'll talk about how I did it.  I need to order new oil seals for the axles, pitman, and clutch, as well as a new gasket for the gear box.  It's nearing the point where I can put it all back together though.  WOOT!

I've also done a little fencing around the place, and have been working on some side projects here and there.  I hope to post the pictures of my work on the mower soon.  It'll be a big boring post to anyone who isn't interested in working on a sickle mower.  :)

Upcoming this year will be wagon rides in December.  Looking to get shoes put on Rachael and Pam near the end of November.  I'm very excited about this.  Also, this year I will be in the Greenville night parade hosting the Park Street Historic Society (the place I give wagon rides).  We're going to advertise the wagon rides, and advertise the Historic Society.  Going to be fun.

Sunday, September 16, 2012

Driving 3abreast for the first time

Today was a great day.  We had temps in the 70s with some cloud cover.  It was the kind of day where I knew I needed to work the horses.  I decided that I wasn't just going to work the horses, I was going to drive Pam, Nellie, and Rachael together in the 3-abreast hitch.


There are a few ways you can hitch up your lines.  One way is to buy a set of 3-up lines, this is like normal team lines but with 2 cross-check lines.  This leaves one set of lines in your hands, and those are hooked to each horses bit.
This is Doc Hammil adjusting a set of 3-up lines
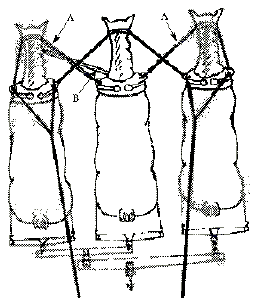
Another way is to use your team lines on the outside horses, with both cross checks going to the center horse.  You then have to create your own cross-check lines that hook from the inside bit of each outside horse, to the hame of the inside horse.
This picture shows the team lines hooked.  A and B point to the extra cross-check lines added from the outside horses to the inside horse
Another way it to use the team lines on two horses side by side, and then use a jockey stick.  The jockey stick attaches to the outside bit of the lone outside horse, and then another line hooks to both bits, and to the belly band of the center horse.  The picture below and the writings with it are from the Rural Heritage forum.  Check out the discussion at:  Rural Heritage Forum on jockey stick
I finally understand better about a jockey stick. It's a bar that has two flattened ends with snaps attached to both ends. The purpose is to keep 2 horses at the distance from each other that the driver wants them to be. That's the bar that is going from B to C. It's snapped into the bit ring (F) on the side farthest away from the horse next to him. The other end (C) is snapped into the hames of the horse near him. In that shot of the 5 from the front, you'll see the driver's used one between the stallion and mare, and on the other side of the tongue, there are 2 jockey sticks, keeping distance between all 3.

That bale string has a purpose, too. Tying it between the bit ring (E) and the hames chain (D) keeps that stallion from turning his head toward the mare next to him.

Besides those two things, he had a tie back that isn't visible in any of the pictures. Note the additional ring (A) that you can see at the bit ring closest to the camera. It is the end of one of two straps, going from either side of the bit, back to a ring on the mare's harness. The purpose of that was to keep that stallion just a little behind the mare.
I don't have 3-up lines, so that eliminated the first option.  My pal Pat gave me a jockey stick and the strap needed for that, but for a first time running the girls 3-abreast, I just didn't feel good about it.  I really wanted something where I felt like I had control over each horse.  This made me decide to try the second option.  Also, I decided that I was going to put my good team (Pam and Rachael) on the outsides as they normally line up, and the new "trainee" (Nellie) on the inside. 

For the cross-check lines from horse to horse, I had heard that lead ropes could be used.  I was going to use that method, however, then I had an even better idea.  I noticed the nice tie straps on the sides of my team harness (you know, the pretty straps on the side that never get used for anything).  I used these straps as cross checks.  So I hooked the team lines up like you normally would, and I took each tie strap, and I looped it through the hame ring on the inside horse and hooked both snaps on the horses bit.  It happened to be the perfect length.  What a great little hidden trick I discovered there.

Since this was the first time doing this, I decided that I really wanted the horses hooked together in the front and back.  For the front, I hooked the horses as pairs with 2 yokes.  This can be seen in later pictures.  For the rear, I also hooked the horses as pairs using the tugs.  (I discussed this trick previously in the blog.  It's where you hook the two outside tugs of a team together in back to keep their butts together.  For 3 horses, the inside horse just had both tugs used and was teamed up with each outside horse).  The rear view picture below will show this pretty good.

With the lines hooked up, and the horses front and rear ends hooked together, it was time to drive.  I decided that I was only going to ground drive the girls today.  I want to make sure that we have a good time before I move to a sled.  I untied the girls, and with a single set of lines in my hands, away we went.

The girls did GREAT!  Well, at first Pam was being lazy, but a little slap of the line to her butt got her up even with the other two.  They were VERY easy to drive.  I was surprised.  I stopped and started randomly to help make sure the girls knew what we were doing.
Pam, Nellie, and Rachel.  This was one of our stops.  If you look close, you can see how I hooked the tugs together to keep their rear ends together.
 I did find one problem with this setup while ground driving.  When starting out one time, Nellie, my center horse, didn't step out.  This caused Rachel and P am, both outside horses, to turn inward and come face to face with each other.  Not good.  We had a few prancy horses as they got confused, but a few slaps to Nellies butt got her stepping forward and solving the problem.  I think if I had the horses hooked to the sled this wouldn't have happened because the tugs would have all been connected to the triple tree.  This would have kept Rachel and Pam from being able to walk too far ahead and turn into each other.
Rachel, Nellie, Pam, and the teamster.  See that grin on my face!  :)  This was just way fun. 

My 3 pretty ladies.  Rachel, Nellie, and Pam.  (Note the two yokes hooking each horse together in front)
What a great day!  The horses did great and I was very pleased with them.  I am very excited to know that from this time forward, I can use all 3 girls when I do farm work.  This will make the job just that much easier on my girls.  WOO HOO!  I can now check off another thing off my "to do" list with the horses.  I'm on cloud 9.

Here are the 3 girls parked after an afternoon of ground driving.  I really have some well behaved girls.

Next time we do this, I'll be hooking up the pioneer forecart and then hooking the sled to the back of that.  It's gonna be fun!


Monday, August 27, 2012

Trip to the Vet today

Today I took my 3 girls to the Vet  The main reason for the trip was to preg check Nellie and Pam.  It was a day full of good news, bad news, and bad news with a good ending.

The Good News:  Nellie is pregnant.  I'm very excited about this. 2 years ago, Nellie threw an awesome filly sired by Vegas (my favorite stallion).  This philly is in Vermont and is winning every show she attends.  I'd love to throw another award winner.  Hopefully we have some good news next spring.  Yay!
This is a very bad picture, but it is supposed to be the foals nose.
While looking over Nellie, I had the vet look at a bulge on her neck.  Ever since she had that bout with colic, she has what looks like some swelling on her neck.  The Vet looked at it right after the colic, and didn't see anything wrong.  Vet looked at it again in spring, and said it seemed to be scar tissue.  Over the summer, it got larger.  The vet ultrasounded it today, and said it still appears to be scar tissue.  A second Vet on staff agreed.  It's good to have a vet to confirm things like this.  Now I won't worry about it, but will still maintain a watchful eye.
Two Vets collaborating on what they throught of Nellie's neck

Since Pam is so herd dependent, I have to keep her near the other horses at all times.

The Bad News:  Pam is not pregnant.  This is the third year that she didn't take.  I'm wondering if it's just been 3 unlucky years, or if there is something wrong.  Pam has foaled in the past, so I'm not quite sure what is going on.  She had 3 weeks of heaven with Vegas this spring, and she was vet checked and appearing to go into heat when I took her to be bred.  Guess we'll just have to try again next spring.  (The funny part about this, is that Pam is a fat mare!  She gains weight so easy and is just a big girl.  Anyone who see's her thinks she is pregnant.  I wonder how big she'd get when she's actually bred.  Hopefully we get to see)
This is pregnant Nellie.  Note she doesn't really even show.

This is BIG Pam.  Not preggers.

The Bad News With A Good Ending:  I brought Rachel in to be examined.  This spring her right eye started watering pretty good.  I've been watching it, and friends have told me that it was probably just dust and flies.  I couldn't see anything that appeared wrong, so I've just been watching it.  3 weeks ago when I was looking her over, I noticed that I could see a little bit of growth on the third eyelid.  That caused concern for me and the wife.  Thus, we took her today to have it examined.  It turns out that it was Squamous Cell Carcinoma (skin cancer).  He did this trick with his fingers where he got the 3rd eyelid to close half way and bulge out so that you could really see what was going on.  Sure enough, there was a growth.
This is Squamous Cell Carcinoma.  A small growth that was normally hidden.  Dr. Smith had a neat trick to make her expose her 3rd eyelid.

The Vet told me that this is skin cancer and is caused from the sun.  He said that it is unusual for darker horses to get it, and that it is more prevalent in light horses (or horses with light colors around their eyes).  There's really nothing you can do to prevent it, it just kind of happens sometimes.  I've had friends with horses that developed this in their eye.  Roger's big old gelding Jack has really suffered from this, and Kim Wright had a mare get one that spread into it's lymph nodes and ended up eating away a ton of the horses face.  This was very scary for me when I heard about this.

The vet told me that he wanted to dope Rachel up, and remove the growth today.  He said that there is a chance it might come back, but that it is a slow growing thing, and removing the growth would be the best thing to do.  I agreed and asked him to do what he could for Rachel.

The vet drugged Rachel up, and soon her face was hanging close to the floor.  Dr. Smith (the Vet) is awesome at what he does.  He spent a few minutes researching the nerves on a draft horse and put in litacane blocks above the eye to make sure Rachel didn't feel a thing.  It looked pretty crazy when he was doing this, but it worked great, and Rachel let him do what he wanted.
Here is Dr. Smith doing the block on her eye nerves.
Block's in place, waiting for drugs to kick in before the growth is removed.

Hmmm ... have the drugs kicked in?  I don't think a horse gets more relaxed while standing up.

It didn't take long at all for Dr. Smith to remove the growth.  Once it was out, he showed it to me.  He showed me the dark part of the tissue, where the cancer was and the red parts that were being irritated.  He also showed me the cut line of the tissue.  All of it was pink, healthy tissue.  This was great.  He felt very confident that it hadn't spread and that we got it all.  Yes, it could still come back, but we're happy with a great removal.  He said that we timed it perfectly:  the growth was big enough to diagnose and remove easily, yet small enough that it hadn't spread.

For a while after, Rachel was crying blood out of her right eye.  Dr. Smith said it will just heal on it's own.  He recommended I just put a fly mask on her and let her out to pasture with the other horses.  I'll bring Rachel back in a month for a re-check and we'll see how it's doing then.

A trip to the vet like this is very satisfying.  I'm not a rich man, and I do have tendencies to not want to give my money to veterinarians, however, there is so much peace of mind knowing exactly what is going on with your horses.  Because of the trip today: I now know that Pam does not need any kind of pre-foaling care; I also know that Nellie does; and I am educated on Rachel and I know that we just did something great to help prolong her life in a happy state.  I love Dr. Smith and how he cares for my horses.  He is one of the few Vet's around here, that recognizes draft horses as the gentle giants they are.  I've been to places that seem to cringe when they see the draft horses, and act like it's an extra burden.  Dr. Smith always smiles big and looks excited for the chance to interact with them.  I got to hear him instruct a grad student today on how awesome the draft breeds are because of their cold blood, and that you should never let the size intimidate you.  I love that kind of thought process.  Today was worth every penny that I gave the wonderful Vet and staff at the Quitman Animal clinic.

Also, as an added bonus, while waiting for drugs to take effect on Rachel, I got to witness a calf with a second tail on it's spine up between it's shoulders (vet removed it), and I got to witness the dehorning of some cows.  Never seen that before.  VERY interesting!


Wednesday, August 22, 2012

Summer Update

Well hello strangers!

Seems like it's been forever since I did anything noteworthy for the blog.  I figured I owed it to those who follow me to give an update on how things are and what I've been up to.

Summer is winding down ...  YAY!  With the summer heat we get, it seems all I can do it retreat inside to the air conditioning.  This means that I don't work the horses, and since my shop isn't air conditioned either, I haven't been working on my mower either.  This week the temps are pulling down into the 80s and it's been quite nice.  Definitely time to get out and do some work outside.

Another thing that has taken up more of my time than normal is my job.  I received a promotion a few months ago, and my 40 hour weeks are now more like 50 hour weeks.  I do enjoy my job, so it's not a bad thing necessarily, it just means I have less hours when I get home to do anything.  Add the 100+ degree temps outside, and it's a bad combination for nothing getting done.

I found a new home for Whinnie.  I had to do an evaluation on my time, and I realized that I didn't have the time to train her the way she needed.  I also didn't have the money to pay someone else to do it, so I thought it was in her best interest to find another home.  I'd rather be the guy to sell a 2 year old philly with lots of potential, than an untrained 5 year old pasture ornament.  Whinnie is currently back with her previous owner and seems to be getting along just fine.

All the other horses are fine.  They spend their days in the trees.  Not only to the tree's provide shade from the hot sun, but they are also good to use to itch your sides from all the pesky flies.  They come up to the house every night for feeding time.

I have done a wagon ride or two at the house as family and friends have been over to visit.  I always do this using Rachael, as she is my easy "pull out of the pasture and go" horse.

That's about it.  Now that temps are cooling down, I expect to get out and do the following:

  • continue sanding down and painting my mower parts.  
  • It's also the time of year to stock up on hay, so I'll be doing that in the next few weeks to.  My wife is staying at home now, and she offered to feed the horses everyday.  This is great because it means I can feed square bales instead of round bales.  With square bales you can monitor the horses intake and give them just the amount they need.  This is a huge money saver.  With round bales, the Belgians just sit around it and eat all day and night.  They go quick when you have 4 of them doing that.
  • I'm going to start the first stage of my barn.  Step one is one 16x16 stall, and 4 feeding stalls and to have it all covered.  I'm looking into plans now and hope to begin building it soon.  I'll be doing it myself, so I'll post updates as I get them.
  • work the horses.  I had Pat get me a triple tree while he was up in amish country this summer.  I am going to work Rachael, Pam, and Nellie 3 abreast.  I plan on using the forecart for this and dragging stuff behind them to add some weight to the pull.  I'm really excited about using the 3 abreast hitch and I'm sure I'll write all about it as it happens.
Hope everyone has had a good summer and enjoyed themselves.  Thanks for checking up on me to make sure I'm still alive and kicking.  :)

Thursday, June 28, 2012

What my #9 mower paint will look like

I found a picture that is kinda close to what I am expecting my mower to look like.
This is kinda what I'm going for.  Blue sickle bar, red mower, blue seat stem.  My wheels will be all white though, no blue around them.  This mower is a McCormick Deering #7, but it is very close to my mower.

I am posting this next picture, because I'm pretty sure this is what my mower looked like before I got it.  If you look close, you can see that the earth has built up and buried many of the parts on this mower.  Rest assured, that the moisture in the dirt, is eating away at that metal, pitting it, and making it rust horribly.  This is why so many of my parts, especially the yoke, pitman, and such, were unusable.

This is a McCormick Deering #7.  See how many of the parts are buried in the dirt ... this will make someone's life very difficult if they were to ever want to restore it into usable shape.


IH #9 Mower Page

Got a horse drawn disc

I have slowly been sanding down and painting the parts of the IH #9 mower.  I currently have the pitman arm ready to go, many of the sickle bar parts ready, and one wheel sanded down and ready to be washed and painted.

Today I added another implement to my arsenal.   One of my neighbors who has quite a collection of old rusty stuff on his land, put an old horse drawn disc up in front of his field, right next to the fence.  I think he put it up there just for me.  I have ridden past on my wagon many times, and so I think he knew that if he put it up next to the fence, I'd come calling. 

My new disc.

Not too shabby!


I bought it from him for the price of 75 dollars.  Not too shabby.  It's not in bad shape.  It is missing the truck assembly and pole stuff, but I think I can get away without needing it.  I have a forecart, and I'm thinking that I'll just hook this up to the back of the forecart.

This disc is unlike the disc I borrowed from Pat.  It only has two levers, that adjust the horizontal angle of the disc (adjust the amount of drag the disc creates).  Pat's also had levers on the side that adjusted the vertical pitch of each side of the disc.  It has the newer grease zerts, instead of the old grease holders.

I'm pretty excited!  Can't believe this was sitting so close to me.

Friday, June 22, 2012

Working on the IH #9 Mower - Total breakdown

OK ... yesterday I got a wild hair ... and I did the unthinkable.  As I was looking at each individual part of this mower, I realized that many of the joints were stuck, and needed to be cleaned and properly lubricated.  This included the intricate lifting assembly.  I started by taking the sickle bar aparts as much as I could (still have the 3 bolts that hold the main yoke shoe that wouldn't budge).
Breakdown of the outer shoe.  Skid, shoe, grass board holder, and the bar

The other end of the sickle bar.  Yoke shoe still attached, wear plates and the skid plate.  Note the 3 bolts I could not get to budge.

I removed the ledger plate that was sticking up.  You can see the rivit sticking up.

The sickle bar

Then I moved over to the mower, and once I started taking off stuff, I couldn't stop.  Next thing you knew, I had a stack of parts, and a bare mower.
Who knew an old toolbox could make such a handy part holder.

You can see the Yoke and push bar here, as well as the tilt lever and part of the lever assembly.  Note that I still haven't been able to get that yoke pin out.  I'm going to have to drill it and find a press to push it out.

A pile of parts.  They are all important, and must go back together the same way.  Can I get them back together, without extra parts?  :)
Most the stuff was easy to take apart, and I always put bolts and pins right back where they were to make it easy to put back together.  I even drained the oil housing, which was mostly water thanks to me not bolting the lid on tight.
You can see lots of water, and a little oily sludge.  I bet this baby is ready for some good oil in her!

Once it was all apart, I laid it all out on a sheet of plywood.  I tried to lay the components that hooked together near each other to aid me in re-assembly.  Once again, I can't say enough about how awesome it is to have The Horsedrawn Mower Book by Lynn Miller.  I couldn't do this without it.

One special note that I learned myself.  HOW DO YOU TAKE THE YOKE OFF THE PUSH BAR???  Well ... it's threaded on.  You have to spin the yoke around the push bar (lefty loosey) and it will come off.  I couldn't find that anywhere, and figured it out.  Mine was stuck good.  What I did was to re-install the push bar to the mower (slide the end of the bar back in its socket, but from the top, so the push bar rested on the frame, and the yoke was at my chest level).  From there I stuck a piece of rebar through the yoke pin holes, applied some PB Blaster, and used all the muscle I had to rotate it.  It wasn't easy, but it slowly came.  WOO HOO!

a bare mower.  Wow ... looks so simple.  :)

In this pic are the seat, tilt lever, clutch assembly, stay bar, lead bar, push bar, sickle bar, end shoe and skit, and sickle blade.  (also on the top right, is the side draft bar, and the hitch assembly.

From L to R; Side draft bar, yoke lift part, yoke, lift assembly, s hook, tilt bar, and across the top you can see the lift lever.

From L to R; Lift lever (across the top), yoke, lift assembly, s-hook, tilt bar, main lift bolt, spring, main lift plate, spring, foot pad bar (used to drop the mower).

And here it is.  All the parts to my #9 broken down.  NOTE:  The Golden Retreiver pup in the background with the big cow leg bone is not part of the mower, but she does make good company while working.  :)

Now that it's broken out, I just have to take it piece by piece and wire brush, clean, and paint.  I also need to decide what I'm going to do about the sickle bar.  Really, I could just buy all new guards and be done with it.  Maybe I'll save my pennies and do that.


IH #9 Mower Page